
Four Positions That Trick Your Nervous System Into Relaxation
The Mechanical Science Behind Letting Go.

Modern life pushes people into postures that pull the pelvis forward, tighten the ribs, shorten the breath, and convince the brain that the body must stay alert. Most people have been stuck in this pattern so long they don’t even register it as tension anymore. They think that’s just how their body feels.
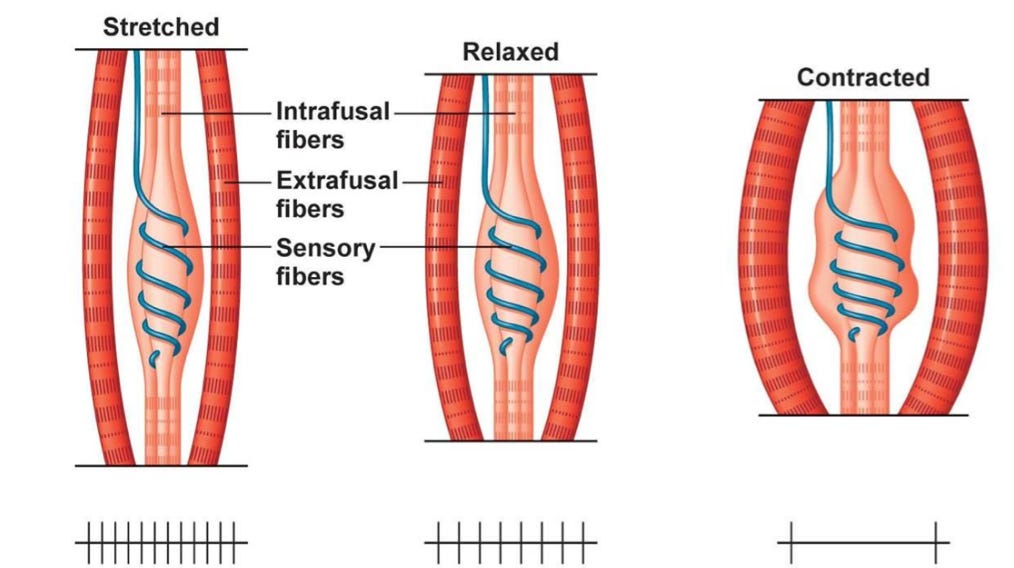
There’s a reason for that. Every muscle in your body has tiny sensors called muscle spindles that report its length to the spinal cord. A feedback loop involving gamma motor neurons keeps those spindles calibrated to whatever length the muscle holds most often.
So if your psoas has been short for years, or your pelvic floor has been braced for months, the nervous system accepts that as the new baseline. The tension stops registering as tension. It becomes invisible.
You can’t think your way out of it because the recalibration happened below conscious awareness, at the level of the spinal cord.
This is why telling someone to “just relax” or “meditate” does nothing. The spindle has to be mechanically reset by holding the muscle in a supported, lengthened position long enough for the gamma system to update. Research on autogenic inhibition shows this takes roughly 90 seconds to two minutes at minimum.
But it goes deeper than muscles. Your brain builds a real-time picture of your body’s internal state through a region called the insular cortex. Bud Craig’s research mapped how the insula collects signals from muscles, joints, organs, and skin, then integrates all of it into one feeling. That feeling is what most people call “how I’m doing right now.” When dozens of muscles are firing low-grade tension signals all day, the insula reads the sum total as threat. You feel anxious. You feel on edge. You don’t know why because no single muscle hurts enough to notice. The picture is built from accumulation.
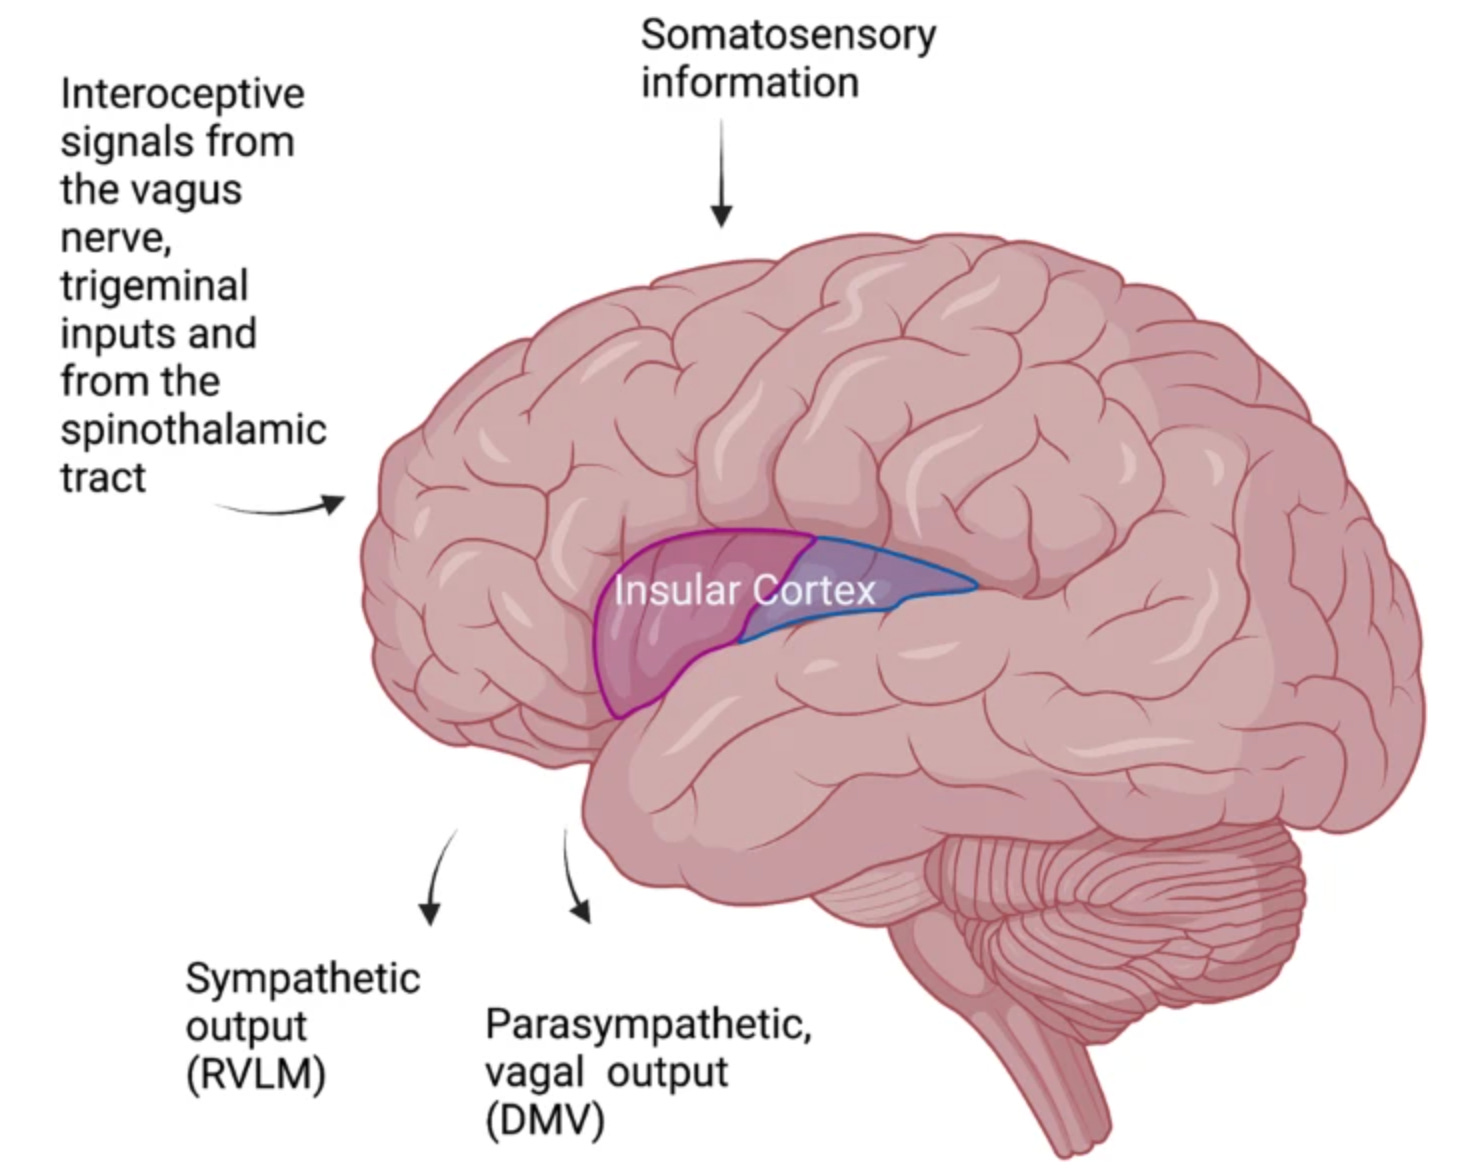
Change the inputs and the picture changes. Less muscular tension, more support from the ground, slower breath. The insula recalculates. Anxiety drops. Nothing changed in your circumstances. The raw sensory data changed.
There’s a chemical layer too. When the diaphragm can’t move fully because the ribs are locked or the psoas is pulling the lumbar spine forward, breathing stays shallow and fast. CO2 levels drop. This shifts blood pH toward alkaline, and alkaline blood makes neurons fire more easily. Muscles get twitchy. Thoughts feel faster. This is predictable chemistry, described by the Henderson-Hasselbalch equation. Restoring full diaphragmatic movement raises CO2, normalizes pH, and calms neural excitability. You didn’t change your mind. You changed the shape of your torso, and your blood chemistry followed.
My grandmother understood this without knowing any of the science. During summers at her farm, I’d watch her move through the day with a rhythm I didn’t appreciate until decades later. Simple exercises in the morning to get blood moving. Small stretches between chores. A few minutes in quiet shapes before bed. She never let tension accumulate in one place for too long, and her body stayed balanced because of it.
I didn’t apply any of that wisdom until my body forced me to. Years of high-stress corporate life ended with an autoimmune diagnosis. Recovery taught me something I wasn’t expecting. It wasn’t only food that healed me. Learning how to manage tension physically, how to actually release it from the tissues, was just as critical.
Most people never learn that relaxation has a mechanical base. It follows rules. Specific positions change the geometry of the skeleton, which changes muscle length, breathing mechanics, blood chemistry, and the signals reaching the brain. Pure physiology. No willpower required. No special breathing technique. Just shapes that let the hardware do what it already knows how to do.
After my post on supported pelvic rest, a lot of you asked for more positions. Here they are. These four poses are all simple. All quiet. All designed for pure relaxation. Each one works through a different physiological door, and I’ll explain exactly why for each one. More challenging positions will come in future articles, but this is where everyone should start.
If you’ve been following me for a while, you already know the first one. I’m going to break it down a bit deeper this time — and for those who’ve never seen it, you need to, because this pose is the king.
Pose 1: Supported Pelvic Rest
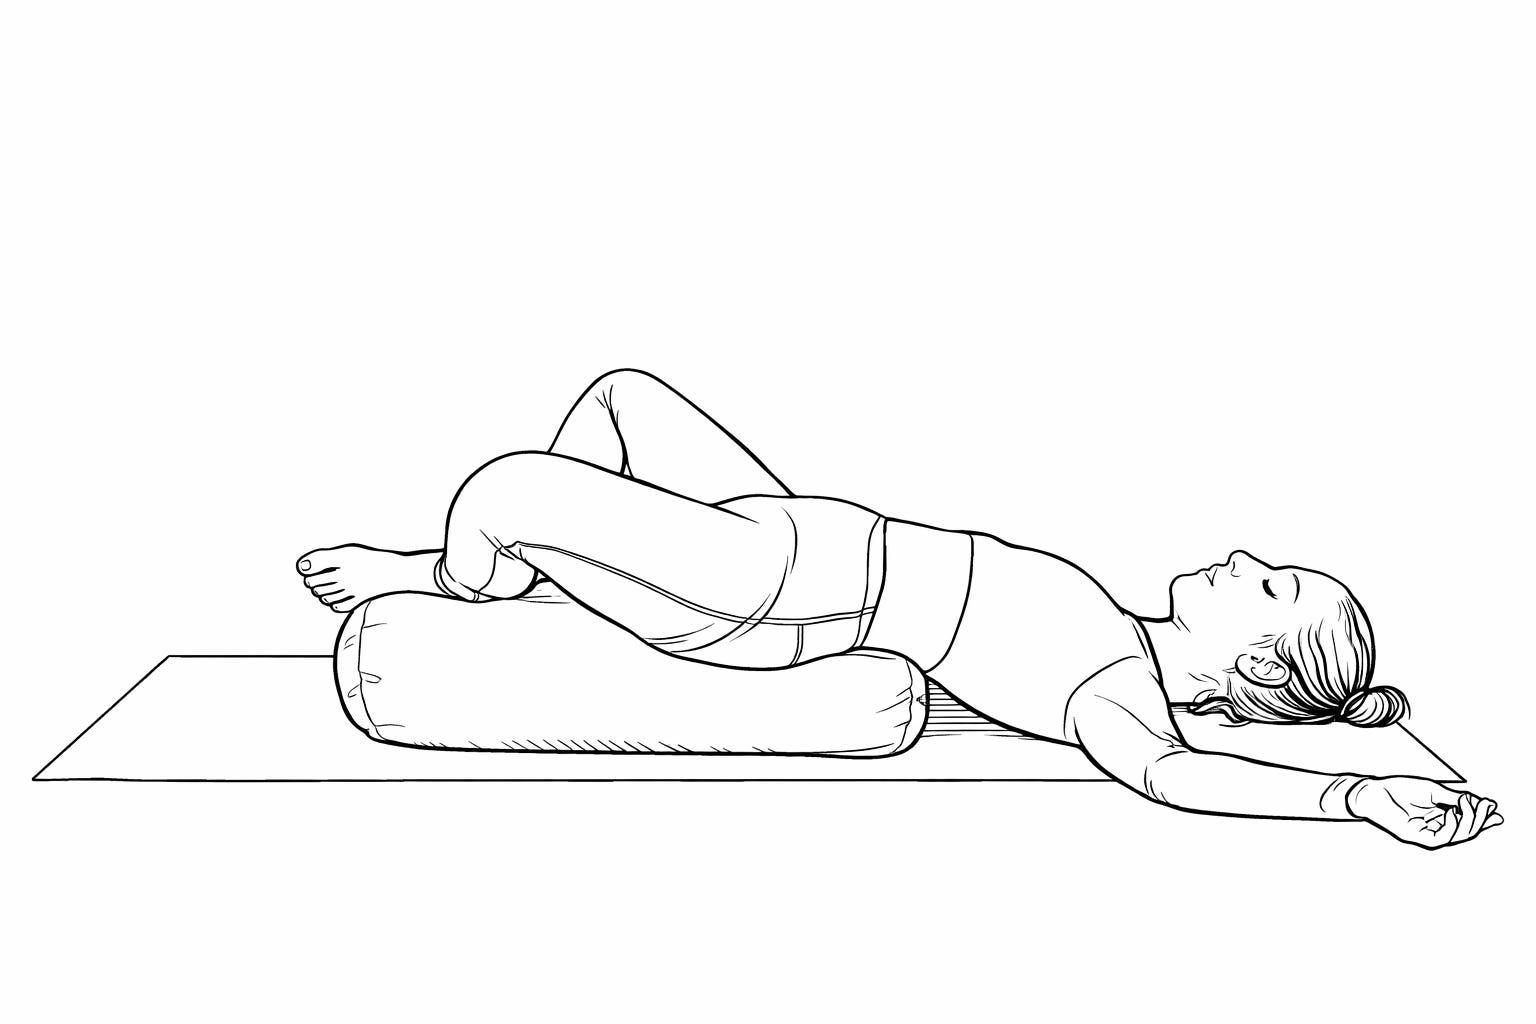
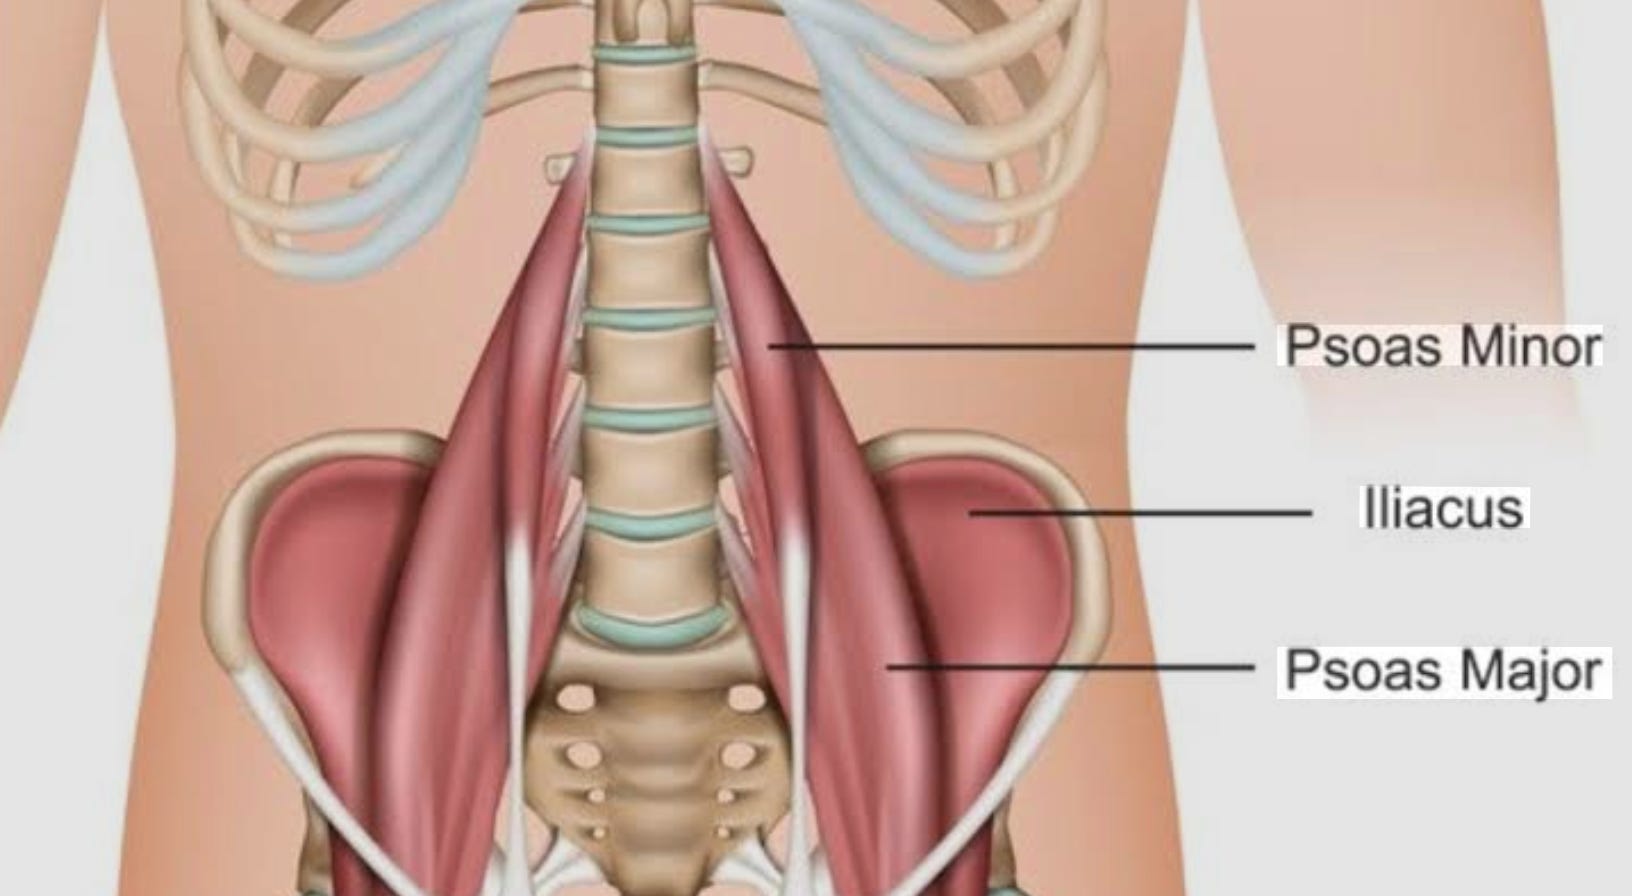
The pelvis is the keystone of the whole tension pattern. When the psoas is chronically short, it pulls the lumbar spine into excessive curve and tilts the pelvis forward. This does three things simultaneously: compresses the lower back, shortens the pelvic floor, and limits how far the diaphragm can descend on inhale. Breathing gets trapped in the upper chest. The nervous system reads this as “the body is ready to move” and keeps stress hormones elevated.
Placing a bolster under the pelvis reverses the entire chain. The pelvis tilts posterior. The lumbar curve softens. The psoas lengthens without any active stretch. The brain registers zero postural demand and starts withdrawing activation from the deep stabilizers.
This is where duration matters. Your tendons contain sensors called Golgi tendon organs that monitor how much force a muscle is producing. When a muscle stays lengthened and unloaded long enough, these sensors trigger a spinal reflex called autogenic inhibition that forces the muscle to release. Under two minutes, the reflex barely engages. Past three, real changes begin. By five to ten minutes, muscles that have been holding for months start letting go.
Those involuntary twitches some people feel in the first few minutes - that’s the gamma motor neurons recalibrating. The nervous system releasing stored patterns. Don’t resist them. Don’t chase them either.
Bolster shape and height are personal, but about 6 to 10 inches high works for most people. It should be firm enough to hold its shape under your weight. The right height is the one where your lower back feels softer within a few seconds. Place it under the pelvis and legs so the thighs, hips, and lower ribs feel held. If you don’t own a bolster, two firm folded blankets or a couch cushion work fine.
Around minute three, breathing usually deepens on its own. You didn’t decide to breathe deeper. The diaphragm gained room because the psoas released, and the body took the opportunity. Between minutes four and eight, you may feel warmth in the lower back or pelvis. That’s vasodilation. Chronic tension restricts local circulation, so when muscles release, blood returns. This matters metabolically. Better perfusion means better oxygen delivery, better CO2 clearance, better tissue metabolism. Tension is a circulation problem disguised as a comfort problem.
Four to ten minutes. Before bed is ideal. Any time works.
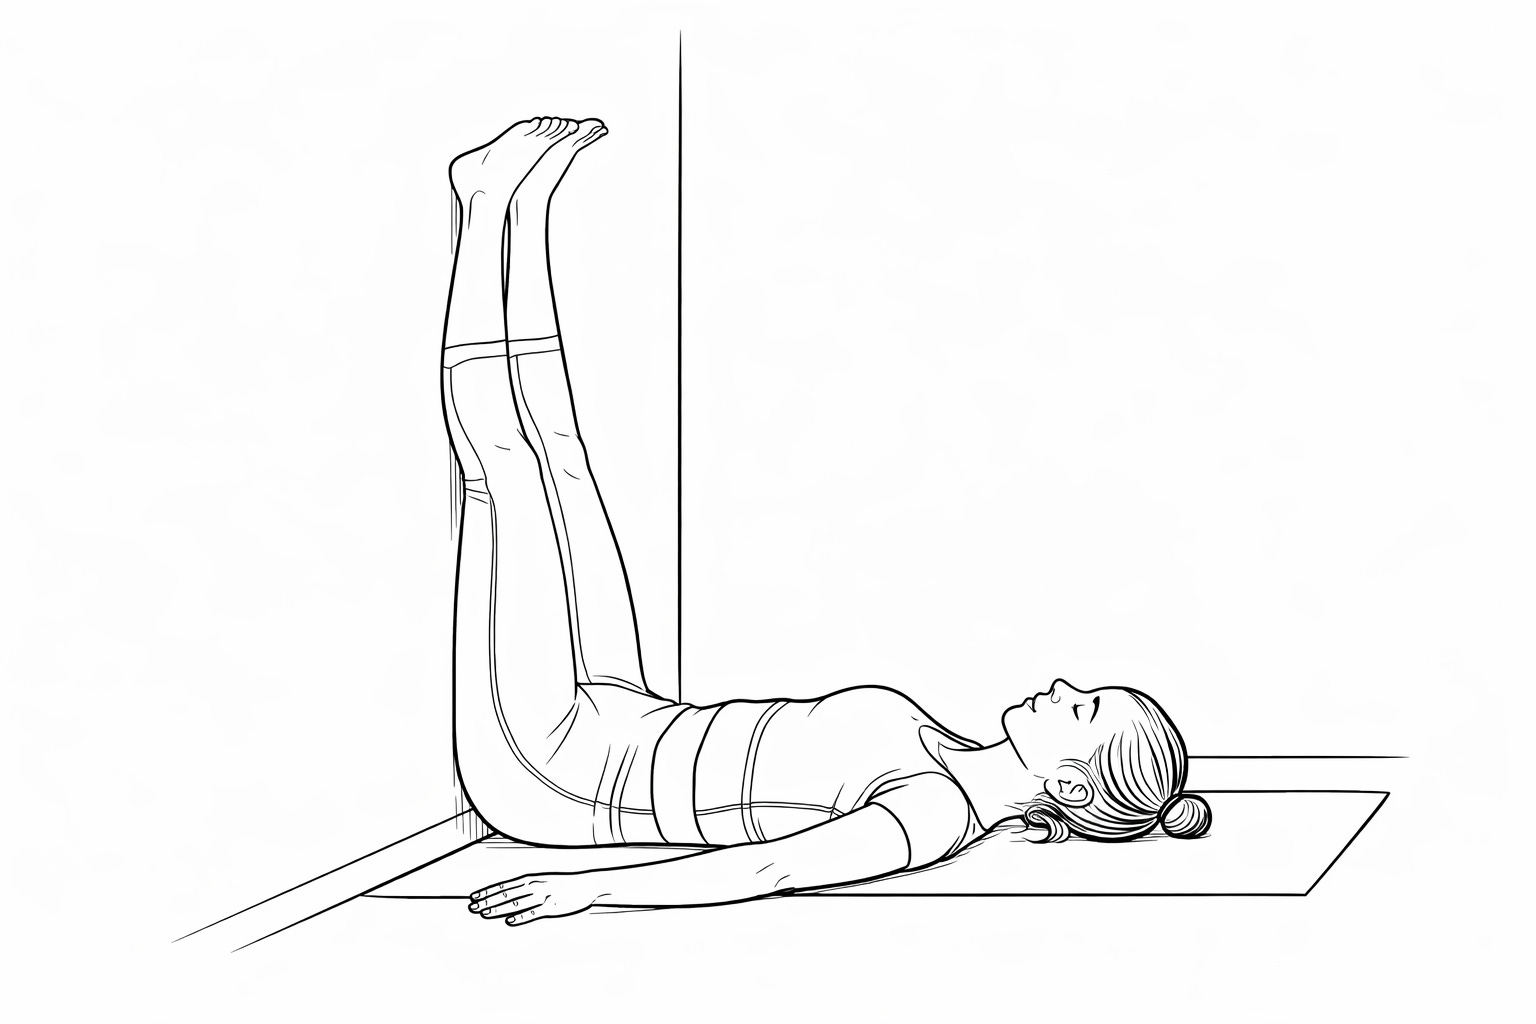
Pose 2: Legs Up the Wall
This one works through a completely different mechanism than the first pose. Instead of resetting muscle spindles, you’re accessing the cardiovascular reflex system directly.
When your legs are elevated above your heart, gravity pulls venous blood back toward the chest. This increases pressure in the thoracic cavity, and baroreceptors in the carotid sinus and aortic arch detect the change. These sensors exist specifically to monitor blood pressure, and when they register the increase, they send a signal through the vagus nerve that tells the heart to slow down. Blood pressure drops. Breathing slows. The whole system downshifts. This is called the baroreflex, and it’s one of the fastest parasympathetic switches in the body. You don’t have to think about it or practice it. Elevate the legs, and the reflex runs on its own.
There’s a metabolic layer here too. People who live in chronic stress often have poor venous return. Stress hormones keep peripheral blood vessels constricted. Blood pools in the legs and feet, hands stay cold, and the heart works harder to circulate the same volume. This pose temporarily reverses that pattern. It gives the heart a mechanical advantage and improves central circulation without any cardiovascular effort. For anyone who feels “wired but tired,” cold extremities, racing mind, heavy legs, this position addresses the circulatory pattern behind those symptoms.
Two versions:
Version A: Legs straight up the wall. Sit sideways next to the wall, then swing your legs up as you lower your back to the floor. Scoot your hips as close to the wall as comfortable. Legs rest against the wall, arms out to the sides or on the belly. This gives the strongest venous return because the legs are fully vertical. If your hamstrings are tight, you’ll feel a pull along the back of the legs. That’s fine if it’s mild. If it’s distracting, move your hips a few inches from the wall or switch to version B.
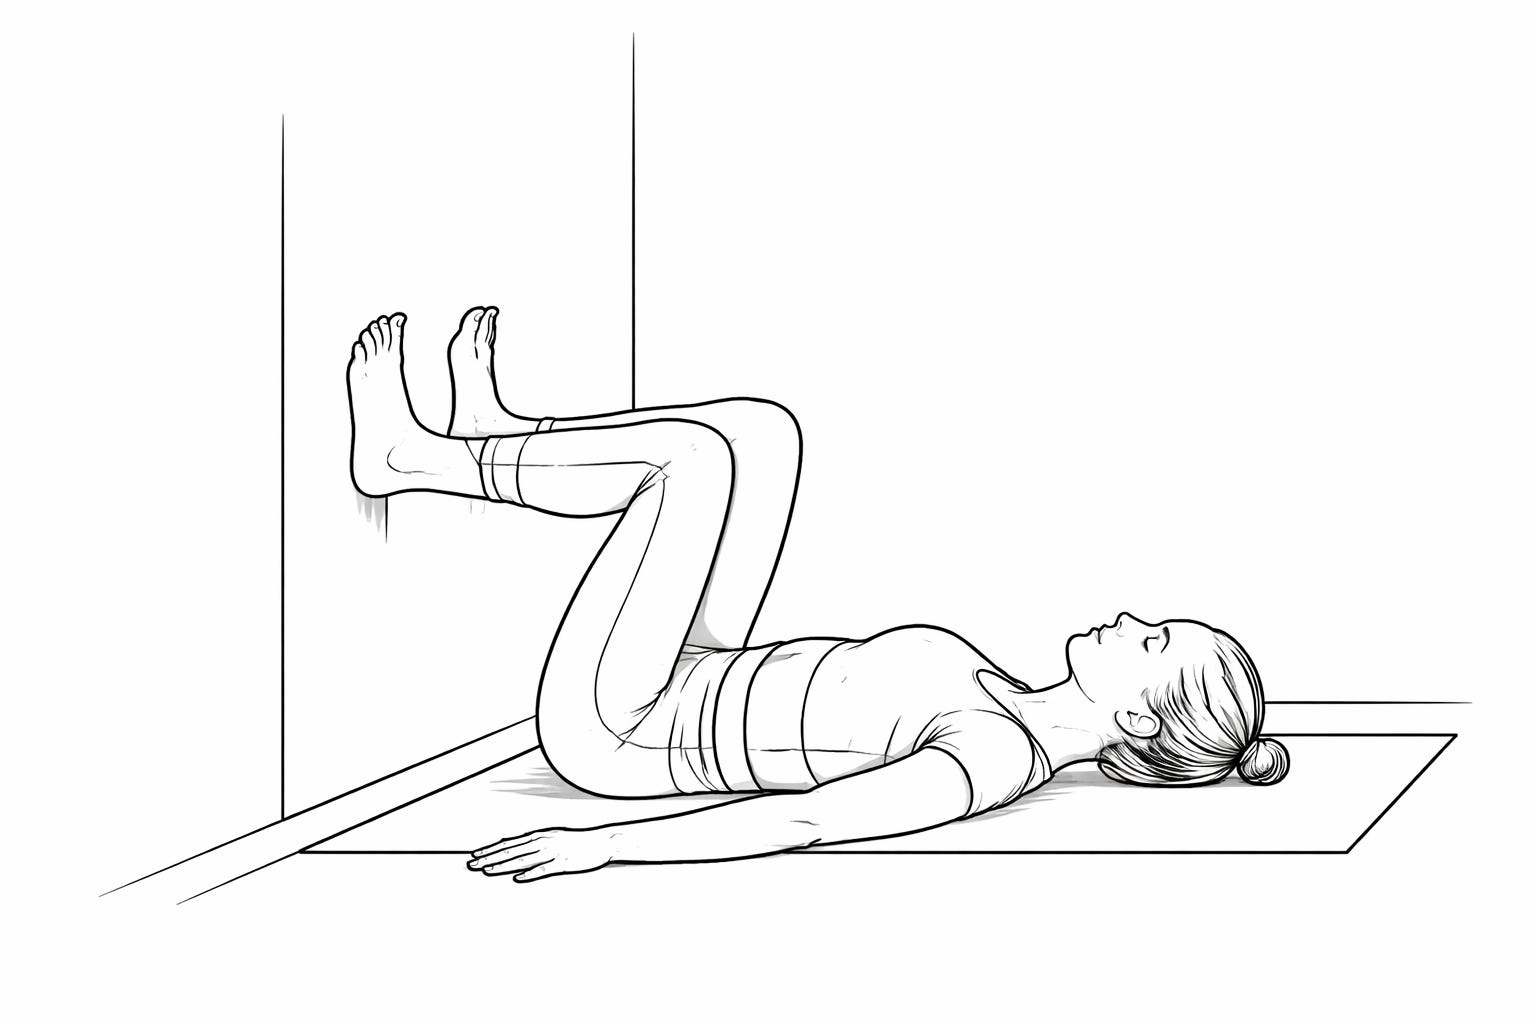
Version B: Feet flat on the wall, knees bent at 90 degrees. Same setup, but instead of straight legs, you place your feet flat against the wall with knees bent roughly at a right angle. This version does something additional. The contact of the soles against the wall activates mechanoreceptors in the feet that signal spatial grounding to the brain. It’s the same type of input that makes standing on solid ground feel stabilizing. Your brain registers “supported, grounded, stable” through the feet while simultaneously receiving the baroreflex signal from the elevated blood return. Two calming inputs through different pathways at the same time.
This version also removes hamstring stretch entirely. That matters more than people realize. When a muscle is being stretched, the spindles send a constant signal to the spinal cord. That signal is sensory noise. It’s not painful, but it keeps the nervous system slightly busy processing it. For someone who’s already overstimulated or very tense, eliminating that noise makes a measurable difference in how quickly they settle. The 90-degree version lets the legs rest at a mid-range length where no stretch receptor is firing. Pure quiet.
If you’re new to this, start with version B. If you’ve been practicing a while and your hamstrings don’t pull, version A gives stronger venous return. Both versions work. The best one is whichever lets you stay longer without distraction, because the baroreflex needs time to fully engage. Three to five minutes minimum. Up to fifteen if it feels good.
Optional: a thin pillow under the head and a folded blanket under the hips if the lower back feels compressed. The setup should feel effortless. If you’re adjusting or fidgeting, something needs more support.
Pose 3: Constructive Rest
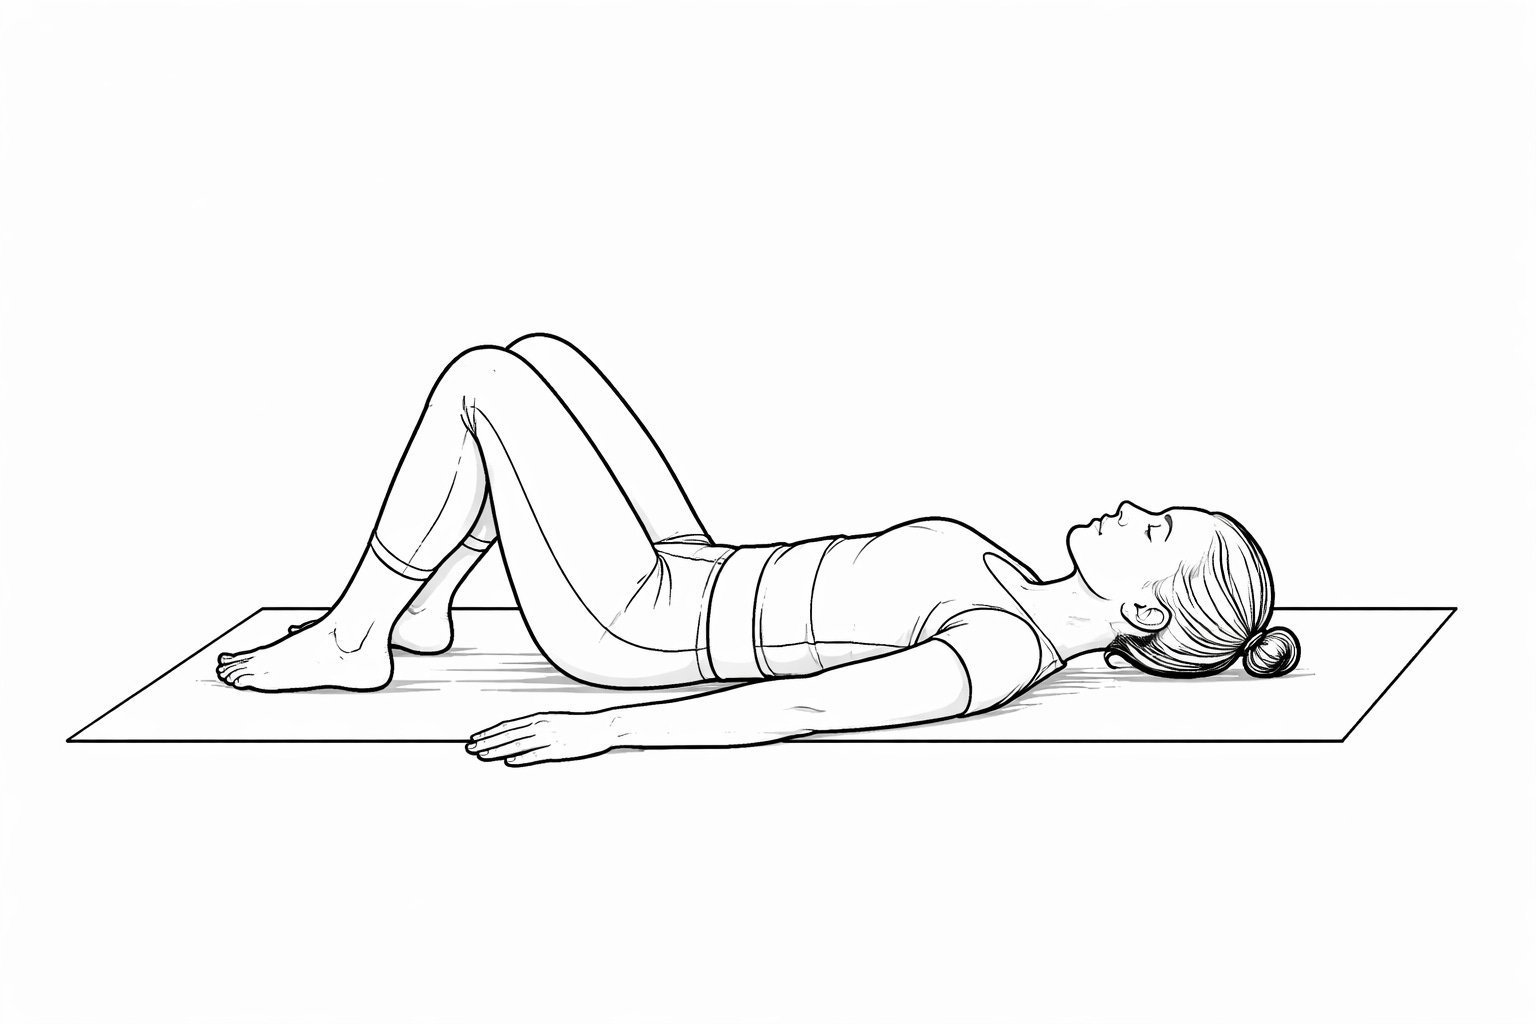
This pose looks like almost nothing. Lie on your back, feet flat on the floor about hip-width apart, knees falling together so they rest against each other. Arms wherever they’re comfortable. That’s it.
The simplicity is deceptive. Constructive rest comes from the Alexander Technique, which I consider the most effective relaxation method I’ve encountered, and I’ve tried most of them. AT literally helped me through one of the hardest periods of my life. I’ll write a separate post about it because it deserves that. But for now, this single position captures something essential about the method.
Constructive Rest alters the relationship between the femur, the pelvis, and the psoas. When the knees fall inward and rest against each other, the adductors release because bone contact holds the position without muscular effort. The hip flexors reduce their firing. The psoas receives less demand because the femur no longer pulls it into a shortened line. That change has an immediate effect on the lumbar plexus. The diaphragm begins to expand laterally because rib rotation becomes easier when the abdominal wall stops bracing against a tight psoas. The abdominal viscera drop slightly toward the spine, which gives steadier sensory input to the vagal pathways. People often feel the back muscles release because the spinal erectors no longer need to compensate for an unstable pelvis.
The soles are in contact with the floor, activating mechanoreceptors in the plantar surface that feed spatial orientation data to the brain. The cerebellum and vestibular system use this input to calculate where the body is in space and whether it’s safe. Grounded feet on a solid surface send a clear signal: nothing is moving, nothing needs to be stabilized. For people whose nervous system is stuck in a hypervigilant scanning state, this input is surprisingly powerful.
This is the gentlest pose in the set. No prop to buy, no wall to find. You can do it on any flat surface, and get into it in seconds. Five to ten minutes.
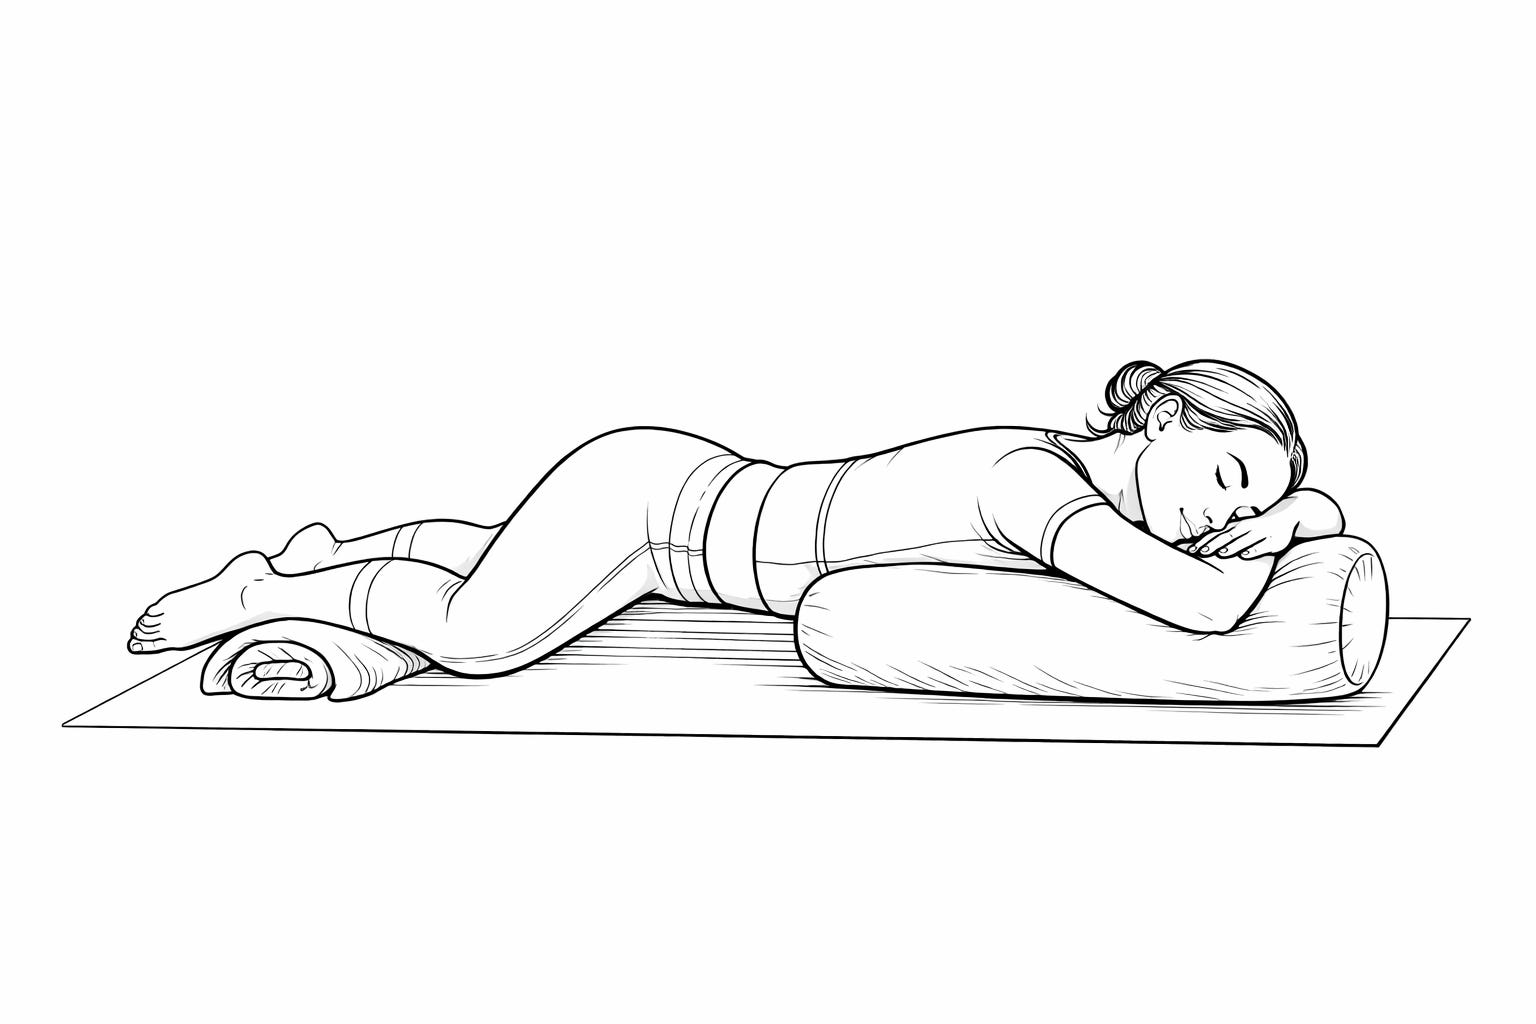
Pose 4: Supported Prone Chest Rest
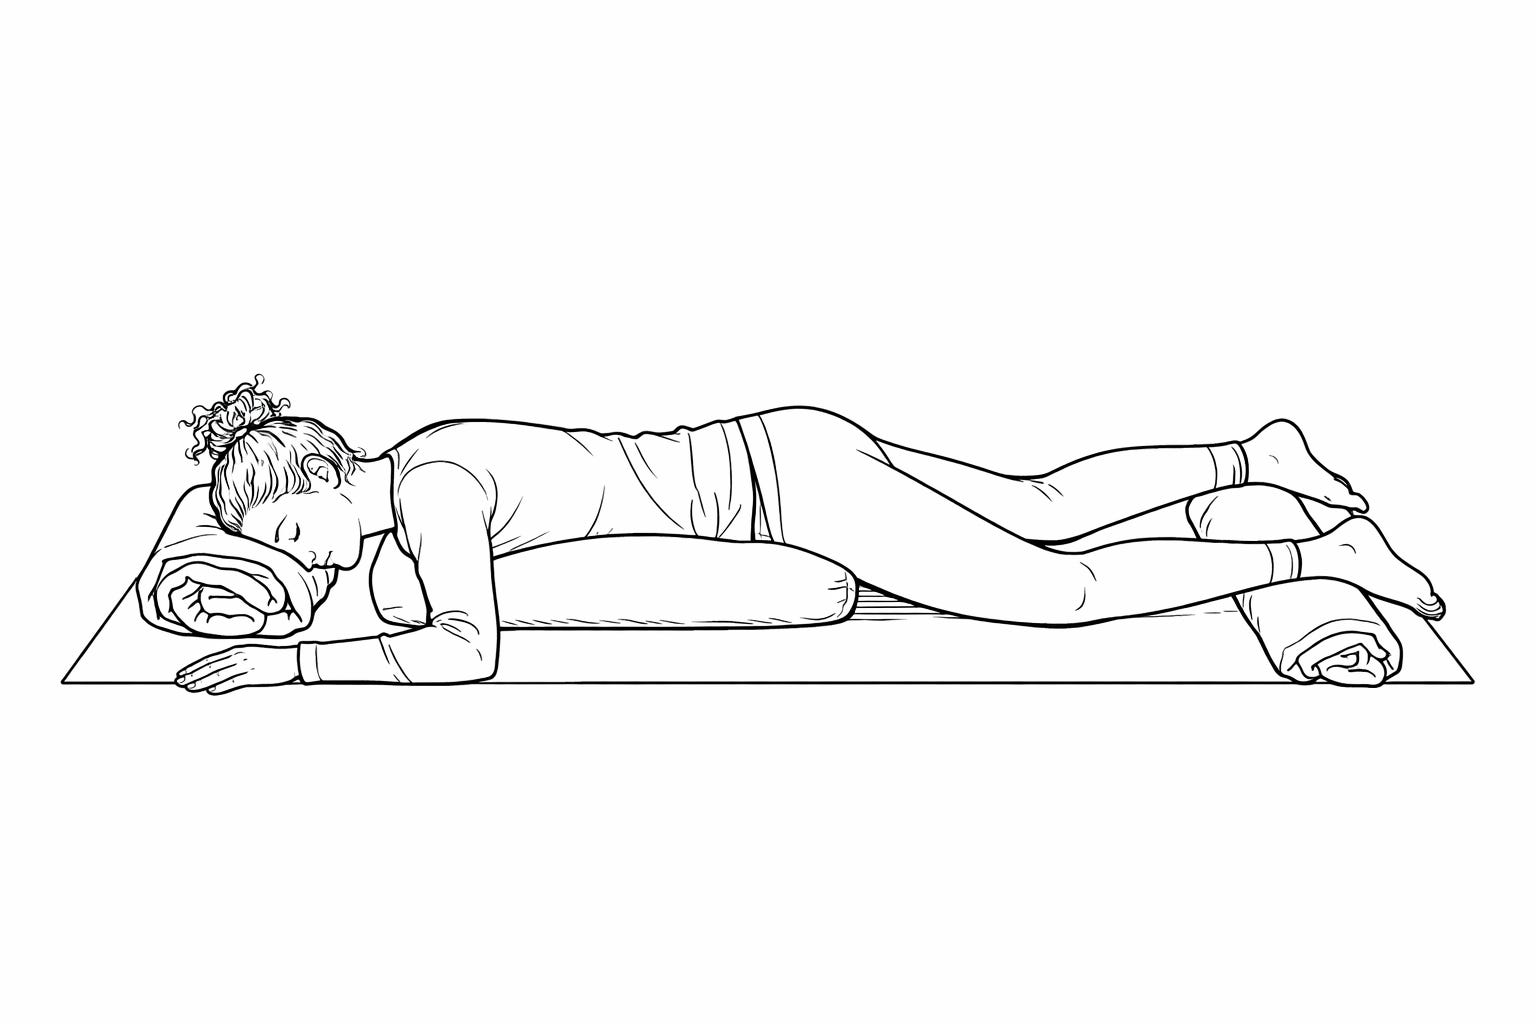
Every pose so far has been on your back. This one flips you over, and the mechanism changes completely.
Lie face down with a bolster or firm pillow running from your chest down to your hips, supporting the entire front torso. A rolled blanket under your forehead keeps the neck neutral. Another small rolled blanket under the lower legs lifts the feet off the floor and softens pressure on the knees.
The prone position creates something unique. Your body weight presses the abdomen into the bolster, which blocks the breath from expanding forward into the chest/belly the way it normally does. The diaphragm redirects. It pushes laterally and posteriorly, expanding the lower ribs sideways and into the back. This pose forces the breath into the full circumference of the ribcage without any technique or instruction. The bolster does the coaching.
This wider breathing pattern is slower by nature because the diaphragm is working against gentle resistance. Slower breaths mean longer exhales relative to inhales, and longer exhales directly increase vagal tone. The nervous system shifts parasympathetic without anyone counting or pacing their breath. The rib movement itself also matters. The costovertebral joints where the ribs meet the spine are densely packed with mechanoreceptors that feed into the sympathetic chain running along the thoracic spine. When those joints start moving more freely, sympathetic tone drops.
There’s another mechanism working through the forehead. The skin and tissue of the forehead are innervated by the trigeminal nerve, which has a direct connection to the vagus nerve through what’s called the trigeminal-vagal reflex. Gentle sustained pressure on the forehead activates this pathway. Heart rate slows. Blood pressure drops. This is the same reflex behind why people instinctively press their forehead into their hands when they’re exhausted or overwhelmed. And yes, it’s also why a forehead kiss feels so good! Same reflex. Same safety signal. This pose just sustains it over minutes instead of a moment. The body already knows this works. The pose gives it a stable surface to rest against.
If the face-down position feels uncomfortable or hard to breathe in, turn your head to one side and rest your cheek on the rolled blanket/bolster or your hands. This is easier for most people and the breathing mechanics still work fully. You lose some of the trigeminal-vagal input through the forehead, so if you go this route, try starting face down for the first minute or two and then turning to the side once the breathing has settled. Switch sides halfway through to keep the neck balanced.
Add to all of this the deep pressure effect of your full body weight resting into the bolster. The same type of sustained pressure input that makes weighted blankets calming. The mechanoreceptors in the skin and fascia read it as safety.
So this single position gives you four parasympathetic inputs simultaneously: trigeminal-vagal reflex through the forehead, slower breathing from diaphragmatic resistance, costovertebral mobilization quieting the sympathetic chain, and deep pressure signaling safety through the skin. Different doors, same destination.
Five to ten minutes. Let yourself be heavy. The floor and the bolster handle everything.
*******************
These four positions share one principle. They remove demand from the body so the nervous system can stop managing and start recovering. No stretching. No effort. No technique to learn. Just geometry that changes the signals reaching the brain.
One thing I want to be clear about. Do not control your breath during any of these poses. Conscious breath control adds a layer of effort and self-monitoring that works against the whole point of these positions. The moment you start thinking about your inhale, you’ve activated the prefrontal cortex and pulled yourself out of the parasympathetic state you’re trying to enter. These poses change your breathing mechanically. The geometry does it for you. The diaphragm finds room, CO2 stabilizes, the breath deepens on its own. Trust the position. Your body already knows how to breathe. It just needs the obstruction removed.
You don’t need to do all four every day. Pick the one that feels most accessible and stay in it long enough for the reflexes to engage. Three minutes is the minimum. Five to ten is where the real changes happen. If you only have time for one, do it before bed. The parasympathetic state carries directly into sleep.
I kept this set simple on purpose. These are positions anyone can do on their first try, on any surface, with minimal props. They’re designed for calming, not challenge. Deeper positions that build on these foundations and work with greater range of motion are coming in future articles. But everyone benefits from starting here.
If something in this article changed how you think about tension and relaxation, share it with someone who needs it. Most people have never been told that their tension has a mechanical base. That one idea can change everything.
Wow. I needed this! I’m dealing with a couple of compression fractures due to cancer lesions in my spine, and my body has been so hypervigilant and tense that I have not been able to sleep much for weeks. I think I will try number three and then I can try the others after the verteoplasty is done. I think you may have just saved— if not my life —then my sanity. Thank you.
Thank you! I love your posts.